The Plant Paradox introduces a groundbreaking approach to dieting, focusing on lectin-free eating. Developed by Dr. Steven Gundry, it highlights how certain plant proteins can harm health. By categorizing foods into “yes” and “no” lists, it helps individuals make informed choices to enhance well-being and weight management naturally.
1.1 The Concept Behind the Plant Paradox
The Plant Paradox, introduced by Dr. Steven Gundry, revolves around the idea that certain plants contain harmful compounds called lectins; These proteins, acting as natural defense mechanisms, can cause inflammation, weight gain, and chronic diseases in humans. The diet suggests that while plants are generally perceived as healthy, not all are beneficial. By identifying and avoiding high-lectin foods, individuals can improve their health and reduce the risk of disease.

Dr. Gundry’s approach emphasizes the importance of understanding how lectins interact with the human body. Lectins can bind to cell surfaces, disrupting normal functions and leading to autoimmune responses. The Plant Paradox diet eliminates or minimizes these harmful lectins, focusing instead on nutrient-rich, low-lectin alternatives. This concept challenges conventional dietary advice, offering a fresh perspective on how to achieve optimal health through selective eating.
The diet’s core principle is to empower individuals with knowledge about the foods they consume. By categorizing foods into “yes” and “no” lists, it provides a clear guide for making healthier choices. This approach not only aids in weight loss but also addresses underlying health issues, making it a holistic solution for overall well-being.
In essence, the Plant Paradox is about redefining nutrition by uncovering the hidden dangers in seemingly healthy foods. It offers a practical and sustainable way to improve health by avoiding harmful lectins and embracing a lectin-free lifestyle.
The Plant Paradox Diet Overview
The Plant Paradox diet, developed by Dr. Steven Gundry, focuses on eliminating harmful lectins found in certain plants. It promotes weight loss and improved health by categorizing foods into “yes” and “no” lists, guiding users toward lectin-free eating for optimal well-being.
2.1 What Is the Plant Paradox Diet?
The Plant Paradox Diet, introduced by Dr. Steven Gundry, is a dietary plan that focuses on minimizing the intake of lectins, which are proteins found in certain plants. Lectins, according to Dr. Gundry, can cause inflammation, weight gain, and various health issues when consumed in large amounts. The diet advocates for the elimination of high-lectin foods, such as legumes, grains, and nightshades, which are commonly found in many traditional diets. Instead, it emphasizes the consumption of low-lectin foods like leafy greens, certain vegetables, and specific types of fruits. The diet also encourages the inclusion of healthy fats, such as those found in avocados and olive oil, and high-quality proteins, like grass-fed meats and wild-caught fish. By following this approach, the diet aims to promote weight loss, improve digestive health, and reduce the risk of chronic diseases. The Plant Paradox Diet has gained popularity for its unique perspective on plant-based eating and its potential benefits for overall well-being.
Understanding Lectins
Lectins are natural proteins found in plants, acting as a defense mechanism against predators. While some lectins are harmless, others can cause inflammation and digestive issues in humans. Dr. Gundry’s approach focuses on identifying and avoiding high-lectin foods to promote better health and weight management.
3.1 The Role of Lectins in Plants
Lectins are naturally occurring proteins found in plants, serving as a defense mechanism to protect them from predators and environmental stressors. They play a crucial role in plant survival by deterring insects, fungi, and other potential threats. Lectins also contribute to seed dispersion by attracting specific animals to consume them, aiding in the spread of plant species. However, while lectins are beneficial for plants, they can pose challenges for human health when consumed in large quantities. Certain lectins, particularly those found in legumes, grains, and nightshades, can cause inflammation, digestive issues, and other health problems in some individuals. This is the core concept behind Dr. Steven Gundry’s Plant Paradox diet, which emphasizes reducing or eliminating high-lectin foods to promote better health and weight management. Understanding the role of lectins in plants is essential for grasping why they can be harmful to humans and how to navigate a lectin-free diet effectively.
Benefits of the Diet
The Plant Paradox diet promotes weight loss, improves digestion, and reduces inflammation. By eliminating high-lectin foods, it helps mitigate chronic health issues like autoimmune diseases and digestive disorders. Many followers report increased energy levels and enhanced overall well-being, aligning with the diet’s focus on lectin-free eating for optimal health.
4.1 Physical Health Improvements
The Plant Paradox diet has been associated with significant physical health improvements, particularly through the reduction of lectin intake. By eliminating high-lectin foods, many individuals experience weight loss, improved digestion, and reduced inflammation. This dietary approach also aims to address chronic health conditions such as autoimmune diseases and digestive disorders. The elimination of harmful lectins can lead to enhanced nutrient absorption, boosting energy levels and overall well-being. Additionally, the diet’s focus on whole, nutrient-dense foods promotes healthier blood sugar levels and improved cardiovascular health. Many followers report fewer gastrointestinal issues, such as bloating and irritability, which are often linked to lectin consumption. The diet’s emphasis on lectin-free eating also supports immune system function, potentially reducing the risk of chronic inflammation-related diseases. Overall, the Plant Paradox diet offers a comprehensive approach to improving physical health by addressing the root causes of dietary discomfort and promoting a balanced, lectin-aware lifestyle.

The Food List
The Plant Paradox food list, outlined by Dr. Steven Gundry, categorizes foods into “yes” and “no” lists based on lectin content. It includes approved lectin-free options like leafy greens, certain fruits, and non-toxic vegetables, while avoiding high-lectin foods such as beans and nightshades. Printable PDF guides are available for easy reference.
5.1 Yes List: Approved Foods
The Plant Paradox “Yes List” provides a comprehensive guide to lectin-free, approved foods. These foods are carefully selected to minimize lectin exposure while promoting overall health and weight management. The list is divided into categories such as vegetables, fruits, proteins, and fats, making it easy to follow.
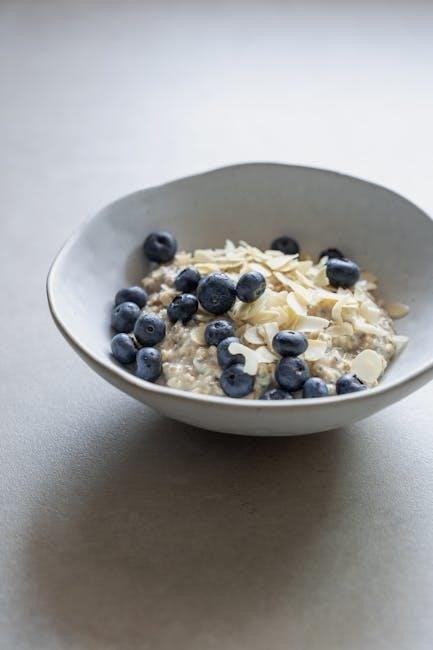
- Vegetables: Leafy greens like spinach, kale, and arugula are highly recommended. Other options include broccoli, cauliflower, and asparagus.
- Fruits: Low-sugar fruits such as berries, avocados, and citrus fruits are encouraged. These provide essential nutrients without spiking blood sugar levels.
- Proteins: Grass-fed meats, wild-caught fish, and pasture-raised eggs are included. They are rich in nutrients and free from harmful lectins.
- Fats and Oils: Olive oil, avocado oil, and coconut oil are approved for their health benefits and low lectin content.
Dr. Gundry also emphasizes the importance of incorporating lectin-neutralizing foods, such as extra virgin olive oil and certain spices, to further reduce lectin impact. Printable PDF guides are available to help users easily identify and shop for these approved foods, ensuring a seamless transition to the Plant Paradox diet.
5.2 No List: Foods to Avoid
The Plant Paradox “No List” identifies foods high in lectins, which are believed to cause inflammation and other health issues. These foods are typically avoided to promote better health and weight management. The list is detailed to help users make informed dietary choices.
- Legumes: Beans, lentils, and peanuts are high in lectins and are strongly advised against. Even when cooked, they retain some lectin content.
- Grains: Wheat, barley, and oats contain gluten, which Dr. Gundry links to lectin-related issues. These grains are recommended to be avoided.
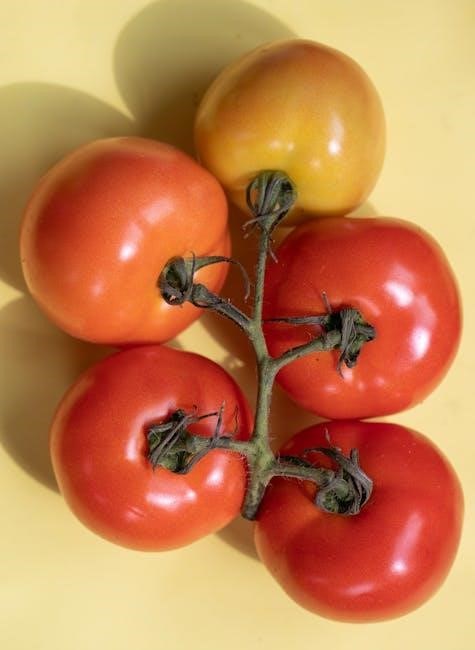
- Nightshades: Vegetables like tomatoes, eggplants, and peppers are on the “No List” due to their lectin content. Potatoes are also excluded for the same reason.
- Dairy Products: Traditional dairy products, especially from grain-fed cows, are discouraged. However, certain high-fat cheeses like triple-cream brie are occasionally permitted.
- Processed Foods: Foods containing added sugars, refined carbohydrates, and artificial additives are highly discouraged as they contribute to inflammation.
By eliminating these high-lectin foods, individuals can reduce inflammation and improve their overall health. Printable PDF guides are available to help users easily identify and avoid these foods, making the transition to the Plant Paradox diet more manageable.
How to Start the Diet
Starting the Plant Paradox diet involves consulting Dr. Gundry’s PDF guides, understanding the yes and no food lists, and planning meals around lectin-free options. Printable shopping lists and meal plans help ease the transition, ensuring a smooth start to the program.
6.1 Step-by-Step Implementation
Implementing the Plant Paradox diet begins with downloading Dr. Gundry’s free PDF guides, which provide a clear roadmap. First, review the yes and no food lists to identify lectin-free options. Next, plan weekly meals using the provided recipes and shopping lists. Start by eliminating high-lectin foods like legumes and grains, gradually incorporating approved alternatives. Stock your pantry with essentials from the yes list, such as leafy greens, avocados, and select fruits. Meal prepping is crucial; prepare lectin-free dishes in advance to avoid temptation. For social gatherings, use the entertaining menus to maintain compliance. Track progress and adjust as needed, ensuring adherence to the program. Finally, stay informed through Dr. Gundry’s resources and community support to maintain motivation and achieve long-term success on the diet.

Managing the Diet
Managing the Plant Paradox diet involves overcoming common challenges like cravings and social pressures. Use Dr. Gundry’s printable PDF guides for meal planning and grocery shopping. Stay consistent by prepping lectin-free meals and leveraging substitute options for restricted foods. Track progress and adjust as needed to maintain compliance and achieve results.

7.1 Overcoming Common Challenges
Adhering to the Plant Paradox diet can present several challenges, particularly when transitioning from traditional eating habits. One common obstacle is cravings for lectin-rich foods like beans, grains, and certain vegetables. To combat this, Dr. Gundry recommends substituting these items with lectin-free alternatives, such as cauliflower rice or zucchini noodles, which mimic the texture and satisfaction of their higher-lectin counterparts. Another challenge is navigating social situations, where meals are often centered around restricted foods. Planning ahead is crucial; bringing a lectin-free dish to gatherings or dining at restaurants that offer compatible options can help maintain compliance. Additionally, initial digestive changes, such as bloating or fatigue, may occur as the body adjusts to the new diet. Staying hydrated and gradually phasing out high-lectin foods can ease this transition. Utilizing resources like printable PDF guides and meal plans from Dr. Gundry’s program can also provide structure and support, helping dieters stay on track and overcome these challenges effectively.

Resources and Tools
Dr. Gundry offers a variety of resources, including a printable PDF guide, to support the Plant Paradox diet. This guide provides a detailed Yes and No food list, shopping tips, and meal ideas. It also includes a food pyramid for easy reference.

Additional tools like mobile-friendly cookbooks and step-by-step meal plans are available, ensuring followers can stay on track effortlessly. These resources make lectin-free eating accessible and convenient, helping users achieve their health and weight goals effectively.
8.1 Printable PDF Guides
Printable PDF guides are essential resources for anyone following the Plant Paradox diet. These guides, available for free, provide a comprehensive list of approved and restricted foods, making meal planning and grocery shopping easier. The PDF documents include Dr. Gundry’s Yes and No food lists, which categorize foods based on their lectin content and potential impact on health.
One of the most popular PDF guides is the Plant Paradox Shopping List, which organizes foods according to Dr. Gundry’s food pyramid. This guide not only helps users avoid harmful lectins but also offers alternatives to ensure they enjoy a balanced and nutritious diet. Additionally, the PDF includes sample recipes and a step-by-step detox plan to help users transition smoothly to lectin-free eating.
These guides are designed to be user-friendly and accessible, making it easier for individuals to stick to the diet. With features like printable formats and mobile-friendly designs, the resources empower users to make informed food choices. Whether you’re planning meals, grocery shopping, or cooking, the Plant Paradox PDF guides are invaluable tools for achieving your health and weight goals.
Furthermore, the guides are regularly updated to reflect the latest research and recommendations from Dr. Gundry. This ensures that users have access to the most accurate and effective information to support their dietary needs. Overall, the printable PDF guides are a practical and indispensable companion for anyone embracing the Plant Paradox lifestyle.

Meal Planning
Meal planning is a cornerstone of the Plant Paradox diet, helping users maintain consistency and enjoyment while adhering to lectin-free guidelines. With the provided PDF guides, individuals can easily map out their daily meals, ensuring they incorporate approved foods and avoid harmful lectins.
A key aspect of successful meal planning is understanding how to substitute lectin-containing foods with healthier alternatives. For example, swapping grains like wheat and barley for lectin-free options such as millet or cauliflower rice can make a significant difference. The PDF guides offer detailed lists of these substitutes, making meal preparation straightforward.
Additionally, the guides include sample meal ideas and recipes, which are perfect for those new to the diet. From hearty breakfast options to delicious dinner recipes, the resources provide inspiration and variety to keep meals exciting. Planning meals in advance also helps reduce the risk of impulsive food choices that might derail progress.
For special occasions or social gatherings, the Plant Paradox meal planning resources include menus designed for entertaining. These ideas ensure that individuals can enjoy celebrating without compromising their dietary goals. By combining creativity with the guidelines outlined in the PDFs, users can create balanced, lectin-free meals that satisfy both their taste buds and health objectives.